The Rage 2.3
Getting Started
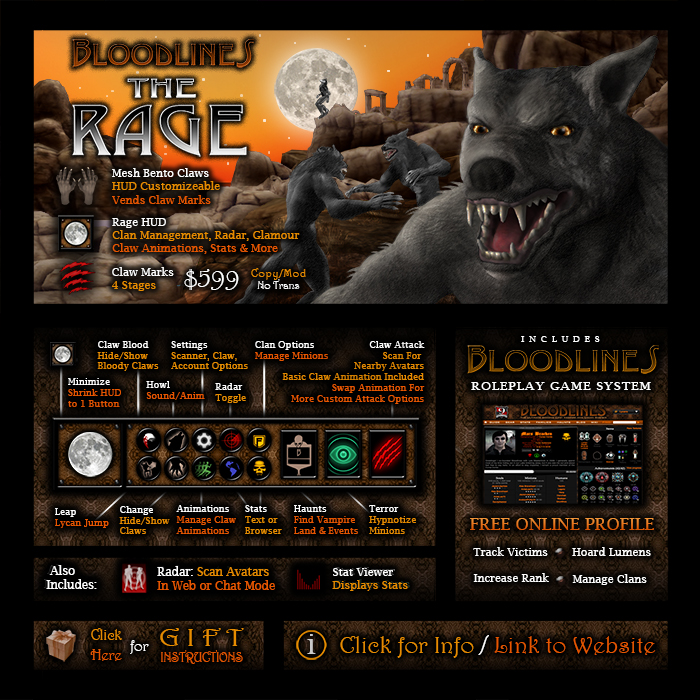
The Rage is the primary package that you need to play Bloodlines and role-play a lycan in Second Life.
You can purchase the Rage at the following locations in Second Life, from the main vendor in the Bloodlines store: Bloodlines Midland, Bloodlines East, and Bloodlines North. After purchasing the Rage, you will be delivered a crate. To open the crate, you must rez it in-world by either wearing it, or dragging it from your inventory to the ground. Then, you can left-click on it to unpack it in your inventory. When you unpack it, you will find the following items:
- Heads-Up Display (HUD)
- Rage Nexus [Bloodlines] 2.3
- Claw Wound
- Stat Viewer
- Four pairs of Claws:
- Bloodlines Claw Male [L]
- Bloodlines Claw Male [R]
- Bloodlines Claws Only Male [L]
- Bloodlines Claws Only Male [R]
- Bloodlines Claw Female [L]
- Bloodlines Claw Female [R]
- Bloodlines Claws Only Female [L]
- Bloodlines Claws Only Female [R]
- Blending layers and alphas:
- Bloodlines Lycan Claw Blend Female (glove)
- Bloodlines Lycan Claw Blend Female (tattoo)
- Bloodlines Lycan Claw Blend Male (glove)
- Bloodlines Lycan Claw Blend Male (tattoo)
- Bloodlines Rage 2.3 Trainer Board
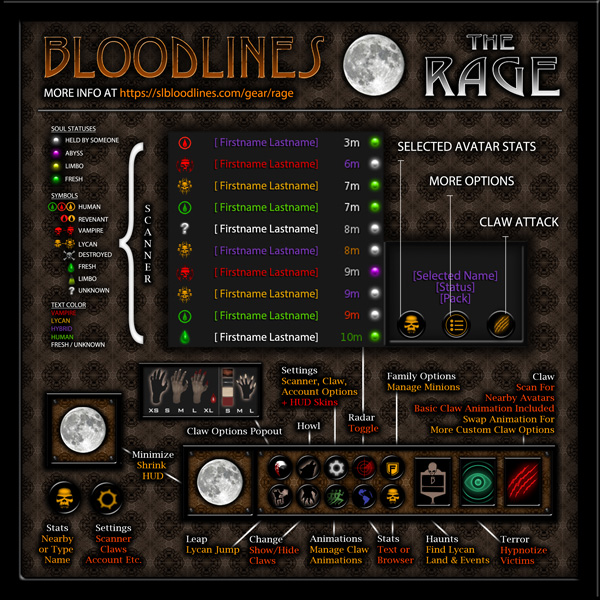
Heads-Up Display (HUD)
Your HUD is what you will primarily use to play Bloodlines. It contains tools, settings, and buttons that you can use to control your claws and interact with other players. To use your HUD, find it in your inventory, right-click on it, and select 'wear'. By default, it attaches to the bottom left position, but you can attach it to any HUD position. You should see it appear in the lower left of your screen.
Buttons
- Claws: To use this menu, you must be wearing your claws. Clicking the button will open up a graphical popout menu above the main HUD. The options are:
- Full Hand Claw Options: Hide, Show Mesh Claw, and Show Mesh Claw with Bloody Tips
- Blood Drip: toggles blood dripping from the claws
- Wrist Adjustment: shown by XS through XL, this will change the size of the mesh wrist to better match your avatar’s arm
- Fingertip Claw Colors: This is a vertical bar showing a few options for the color of the fingertip claws - blood, bone, black, brown.
- Fingertip Claw Size: Shown by S M L, this will change the size of the rigged mesh fingertip claws.
- Fingertip Claw Show/Hide: Clicking the main icon of the hand with the fingertip claws will show/hide them.
- Howl: wolf howl and animation. If you want to change this, you can exchange the howl animation and sound in your HUD.
- Shift: your Rage HUD crate includes a script called _lycan_change. You can place this script in any attachment that you want to be controlled by your Rage HUD. The shift button will make these attachments appear.
- Unshift: The unshift button makes your attachments which have the _lycan_change script in them become transparent.
- Settings
- Claw Mode: set claws to Bloodlines mode or Free mode. In Bloodlines mode, attacks will transfer Lumens or Humanity from your victim to you. In Free mode, the animation will play, but no metrics will be transferred.
- Jump: turn Lycan Jump on or off. If you are enraged as a lycan, you can use this to do a super jump, to activate the jump, just hold the left mouse button, and then tap up arrow and down arrow at the same time.
- HUD Options: choose from various HUD skins, or change the HUD size.
- Nexus: Here you can set your Nexus object to visible or hidden. Visible is useful for adding animations to your Nexus object (you will have to rez it on the ground to add animations that are no transfer or no copy).
- Help: load this Help page.
- Scanner:
- List Length: set the maximum number of names to show on your radar. This can be between 1 and 16 names.
- Scan Mode: set the format of the stats to Text or Web. In text mode, when you press the stats button on the info window on the HUD, the target avatar's stats will be printed in local chat. In web mode, it will open up their web profile on slbloodlines.com.
- Scan Type: set scanner type to 'Full', or 'Lite'. The Full scanner includes clickable names, and displays stats on nearby avatars. The Lite scanner is the 'old' scanner, that only shows the names of nearby avatars, and can be used while the HUD is collapsed.
- Animation: open the animation menu, see Animation, below.
- Family: open the pack options menu, see Pack, below.
- Gender: set gender to male or female. This is only used for gender-specific titles like King or Queen.
- Stat Reload: reload your stat viewer and your metric bar on your HUD.
- Account: manage your account on slbloodlines.com.
- Animation
- Emote: choose whether you wish to us regular or Bento (mesh head) emotes when using the emote button.
- Anim On / Off: show or hide animations. If animations are off, metrics can still be transferred, but the attack animations will not play.
- Claw Anim: if you have added custom animations to your claws, this allows you to select which animation you want to play. See 'Adding Custom Animations', below.
- Radar: this button expands and collapses your radar list that shows information about nearby avatars, and their status in the Bloodlines system. The possible statuses are:
- Fresh: this is someone who has never been bitten. If you can attack them, you can get their soul!
- Limbo: this person has been bitten before, but has not joined Bloodlines. If you want to get their soul, they need to drink the Wormwood potion. If you attack them after they drink the Wormwood potion, and then they join Bloodlines, you will get their soul.
- Registered Bloodlines player: registered Bloodlines players are represented by a symbol that indicates their status. You can find out more about statuses here: http://slbloodlines.com/guide
- Unknown: If someone shows 'unknown', they may be wearing a garlic necklace, or may have been banned.
- Destroyed: if someone is destroyed, they have let their Lumens drop to zero, and have lost all of their souls. Try offering them some lumens and see if they want to join your pack!
- Held: this soul currently belongs to someone.
- Fresh: this soul is new.
- Limbo: this soul has been claimed with a attack, but has not been transferred yet. It can be rescued with the wormwood potion.
- Abyss: this soul has been lost to the abyss. If this avatar drinks the Hemlock potion, and then you attack them, you can retrieve their soul. 4.Web Stats: gives you a link to open your web profile on slbloodlines.com
- View Bans: view a list of the names of avatars banned from your minion list.
- Resist Glamour: if you have been previously terrored or glamoured, this will break the spell.
- Free Minion: remove a minion from your minion list, without banning them. They will be able to set you as their liege again if they want.
- Ban Minion: remove a minion from your minion list, and ban them so they cannot re-liege to you.
- Unban Minion: remove a minion from your ban list.
- Set Liege: Set another avatar as your liege. This is how you join a pack, by setting any member of that pack as your liege. Selecting this option will give you the option of selecting someone nearby, or typing in their name. If you select 'Nearby', you'll be given a list of names of nearby avatars to choose from. If you select 'Type Name', you will be presented with a text box to enter a name in.
- Set Family: If you want to be a pack leader, this lets you set the name of your pack. If you have set another avatar as your liege, then your pack name will be the same as their pack name. You can change your pack name at any time, as long as it isn't already taken, and all members of your pack will be set to this name.
Other Features:
- Lycan Jump: Once you've been enraged as a lycan, you can use the lycan jump. To activate the lycan jump, just tap down and up at the same time. You can turn this ability on and off through the settings menu.
- Moon: The moon on your HUD shows how many lumens you have. The more full your moon is, the closer you are to 50 Lumens.
Claw Wound
The Claw Wounds are copy and transfer, meaning you can hand them out to your friends, and if they're wearing the Claw Wounds when you attack them, blood will squirt out of their wound.
Stat Viewer
Your stat viewer gives you and others around you a visual indication of your Bloodlines stats. By default, it attaches to your stomach. (This is so it doesn't move around too much when you walk.) But, you can attach it to any attachment point you like. It will show your generation, pack name, status, and your metric values like humanity, Vital Blood, or Lumens.
Nexus Object
In The Rage 2.3, we've moved clawing and animating functionality out of the claws, and into what we call the "Nexus Object". The Nexus Object is an object that will attach to the 'Avatar Center' attach point by default, and by default, will be hidden. You will need to be wearing your Nexus Object in order to send attack requests and use some of the other functions of the Rage HUD. The claws are now only cosmetic attachments, you don't need to use or wear the Bloodlines claws anymore if you don't want to. You can wear your favorite claws from another creator, make your own claws, or wear no claws at all, it's up to you. But, we have included several different options for high-quality claws with The Rage. To read more about the Claws, see Claws, below.
Moving Custom Animations
If you owned a previous version of The Rage, you may have custom animations stored in your claws. You will need to move any custom animations you had in your claws into the Rage Nexus Object. To do this, please follow the steps below:
- If you have a copy of your custom animations saved somewhere in your inventory (recommended), then you can skip to step 3. If you don't, and you only have your custom animations inside your current claws, continue to step 2
- You will need to access the inventory of the current copy of your claw that contains your custom animations. You can do this with the claw attached to your avatar, or with it rezzed on the ground. It may be easier to select if it is rezzed on the ground.
- Rezzed on the ground:
- Detach your claw from your avatar by right-clicking on it in your inventory and selecting 'Detach From Yourself'.
- Drag your claw onto the ground in front of you.
- Right-click it, and select 'Edit'. The build options window will come up.
- Attached to your avatar:
- You will need to cam onto your arm by holding down the alt key, clicking on your avatar, and dragging until you see the front of your avatar.
- Right-click on your claw and select 'Edit'. It may be helpful to highlight transparent items by pressing ctrl+alt+t. Selecting edit will open the build options window.
- Rezzed on the ground:
- In the build options window, go to the 'Contents' tab. In there, you will see your custom animations. They will be named like "[animationname]_attacker" and "[animationname]_victim". Select these animations and drag them into a folder in your inventory to save for later. Do not copy the default animations 'curse', 'enrage’, ‘claw_attack', 'same_attacker', 'same_victim', 'shorter_attacker', 'shorter_victim', 'taller_attacker', 'taller_victim'.
- Now that you have all of your custom animations in a folder in your inventory, you can put them in your Nexus Object. Rez your Nexus object on the ground, and then make it visible by pressing the 'Settings' (gear) button on your HUD and selecting Nexus > Visible. Your Nexus Object should appear.
- Right-click your Nexus Object and select 'edit'. This will open the build options window. Go to the contents tab to access the inventory of the Nexus Object.
- Select all of the animations in your inventory that you saved in the previous step, and drag them into the contents window. Now you can select your custom animations either by going to Settings > Animation > Claw Anim on your HUD, or pressing the Animations button directly, and selecting ‘ClawAnim'.
Claws
Previous versions of the Rage (2.21 and before) require you to be wearing your claws in order to attack, and to use many of the functions of the HUD. Starting with version 2.3, the claws are only cosmetic attachments that you can choose to wear or not. You can wear claws from another creator, claws that you create yourself, or no claws at all, it's up to you.
There are two types of claws that come with the Rage, ones that are a full mesh hand and another that are just fingertip claws. The crate includes male and female versions of each. The fingertip claws were positioned to work with Slink hands or hands that are rigged similarly to Slink. The fingertip claws may not fit your mesh avatar. The full mesh claws come with 5 different wrist sizes that will match the default second life avatar for different levels of the "Torso Muscles" setting:
- XS Male - 28, Female - 21
- S Male - 36, Female - 31
- M Male - 52, Female - 36
- L Male - 90, Female - 40
- XL Male - 100, Female - 55
You can change the wrist size using the claws menu on your Rage HUD.
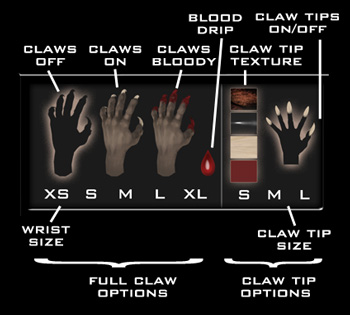
The Claw Panel
This version also includes a popout panel to control the options for your claws. It allows you to set which claws you want to work, and what their appearance will be. See the diagram below for more info on how the panel works.
Support
For support on the Rage, please contact one of the following avatars in Second Life: Lyle Maeterlinck, Mars Bracken, or LiquidDesigns Resident.